Monday, November 26, 2018

3 Quick & Easy Shop Hacks


Three Quick & Easy Shop Hacks

I guess everyone has their favorite shop hacks.  Whether it saves time, space or just makes a tricky task easier there are thousands of little tricks out there that make life in the shop a little more enjoyable.  Here are three of my favorites.

1.       Drying Rack
Cabinetry, furniture, bookcases and built ins are all projects that can clog up a workshop.  They take up a lot of space especially in the finishing stage when everything is spread out drying and nothing else can be done for fear of dust getting into the finish.  A vertical drying rack is one way I have found to make the process more manageable and, in some cases, cut out a second round of finishing. 
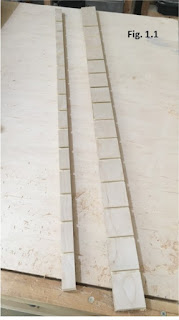
More often than not, these projects involve a dado slot whether it be done by a table saw or router.  When the project involves a number of small to medium size pieces that will have to be finished individually like shelves or drawer bottoms, I will take advantage of that dado setup and run a series of repetitive dados in some scrap wood. (Fig. 1.1)   When these boards are securely attached to an unused wall, side of a workbench, or something stable, it becomes a great drying rack.  Just slip one edge of the material you finished into the dado you cut and let gravity hold it out of the way. (Fig. 1.2)


2.       Instant Handle
I have a tendency to keep a number of those inexpensive foam brushes on hand.  Since they are cheap, they are great for when I want a throw away brush.  They work for paint, polyurethane and even glue.  When I have used them, I wrap them in a plastic bag and separate the wooden handle from the foam brush.  (Fig 2.1)   Having a few of those wooden handles around can be very handy.  They are soft wood, but they are convenient and already have a centered hole cut in one end. 
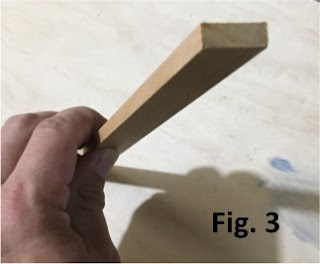
A few of the uses I have employed include file handles, hooks, pushing rivets into stubborn material, inserting a nail to make a marking tool, and extension for a hex wrench.  (Figs 2.2 & 2.3)   I am sure there are countless other uses I haven’t stumbled on yet.


3.       Center Marking jig
When I have to use screws or drill for through dowels in a project, I like them to be centered, but more importantly, lined up consistently.  If there are more than 2, I prefer not to have to measure and mark with a speed square.  Typically, I am going to have to put in 20 or more screws in a project by the time it is all said and done so I want a faster and more accurate method. 

This little center marking jig is very easy to make.  Just take a scrap piece of lumber at least 3/4" thick and mark the distance from the edge you want your screw holes.  Drill a 5/32” hole through the scrap wood you just marked which is a slightly smaller diameter than a 12 penny nail.  (Fig. 3.1) 

  Then with some glue and a few small nails, I attach a rail to the side of the scrap block. 
The next step is to cut a 12 penny nail just longer than the thickness of your scrap lumber.  (Fig. 3.2) Next, cut off the ends of a plastic screw anchor with a utility knife so it is  shorter than the length of the nail and place it around the shaft of the nail.  (Figs. 3.3 & 3.4)


The plastic screw anchor is a sacrificial piece to space the nail centered in the chuck of a drill below the nail head.  By spinning the nail against a file or piece of sandpaper, I can put a blunt point on the end of the cut off nail.  (Figs. 3.5 & 3.6)


Place the nail in the hole in the scrap lumber with the point protruding out the side you marked.  That side will be precisely the spot you marked in case the drill wondered or your angle wasn’t dead straight.  (Fig. 3.7)   You can put marks on the edge of the guide for the spacing you want between your screw holes. 

Just tap the end of the nail to make a divot in the wood marking you drill hole.  (Figs. 3.8 & 3.9)  One added advantage to the speed is that the divot serves to keep the tip of your drill bit from wondering when you start to drill the hole.  It is especially effective with brad point or taper drill bits.


Rod Gunter is the Executive Director at Gunter Building Solutions and has over 20 years of experience in the homebuilding and cabinetry industries.  Rod has been responsible for building over 200 homes above the $500,000 price point.  Rod has trained large groups including all the major home centers on selling skills, construction techniques and sustainable natural wood products.  Rod resides with his family in Holly Springs, North Carolina.  Gunter Building Solutions owns WoodAirGrille.com which produces wood return air filter grilles and wood return air vents.

Tuesday, October 30, 2018

Easy Wood Printer Stand (Universal Shelf)

It is funny, or irritating depending on your disposition, how one thing tends to lead to another.  When I was building houses, we used to joke around about how a minor last minute color change could lead to fifty thousand dollars in change orders.  In fact, I was once asked how to fix a kitchen cabinet with a very minor and easily repaired delaminating veneer corner.  Within a few hours, the couple had talked themselves into, and put down a deposit, on a thirty thousand dollar kitchen remodel.
That is how this project started.  My old printer finally died.  I should have been better prepared considering the screen had been blinking on and off form months, the chances for a paper jam were about one in six, and it seemed to have an ongoing auto-response to my computer telling it to print that is identical to my 8 year old’s auto-response to my wife telling her to take a bath.  So, when I brought in the new printer, the power cord was on the opposite side which immediately initiated a return trip to the store for a new surge protector.  It was then that I discovered that the new printer would not sit neatly on top of my safe because the feet were further out and hung off the side.
At this point, I refused to go shopping for a printer stand knowing I would never find one I really wanted anyway so I went into the shop and within 90 minutes built a very strong printer stand that fit exactly the way I wanted.  The design can be used for a printer stand, a shelf on top of a desk, stacked on top of each other to form a type of bookcase or anything else you may come up with.  The one I built is 19 ½” wide, 17” deep and 15 ½” tall, but, you can make it any size you want to suit your needs.  However, suggest staying under 30” wide to minimize the chance of bowing.  I built mine specifically to hold a wide format printer above my safe.
I started by cutting 1x2s down to the desired length.  I needed 6 uprights, 4 side cross members, and 2 back cross members.  I used 1x4s for the top because that is what I had lying around but you could use any width.  Below is a calculation for cutting based on your desired finished dimensions.
  • 6 pcs. Uprights – 1×2 = desired finished height minus ¾”
  • 4 pcs. Side cross members – 1×2 = desired depth minus 3”
  • 2 pcs Back cross members – 1×2 = desired width minus 4 ½”
  • Top = desired depth divided by width of boards. (one board may have to be ripped, substituted, or left with an overhang.  Cut number of bards to desired finished width.
Once I had all my pieces cut, I glued together my top.  Glue is the only connection I used for the top and I wanted to allow it the most time to dry.  According to the bottle it needed a half hour before I could start working with it again (fig. 1)
fig 1 printer stand by WoodAirGrille
While that was drying, I cut the dowel Holes in the sides of the uprights and the ends of the cross members with a simple doweling jig.  (figs. 2, 3, & 4).  You can use screws and glue for these joints, but I did not want to have to either see the screws or deal with plugs since some of these joints will be visible.
I now simply glue and clamp the frames together.  I used ¼” x 1 ¼” dowels.  Once glued I shoot through the back of the frame into each dowel on either side of the joint to lock it in.  This will hold the joint securely long enough for the glue to dry while I continue to work on the structure. (fig. 5)
fig 5 printer stand by WoodAirGrille
After sanding all of the frames and the top smooth using an orbital sander, I ran a bead of glue along the outer upright of the back frame assembly and clamped the back and side it into position. (fig. 6)
fig 6 printer stand by WoodAirGrille
Then, after predrilling the holes (fig. 7), I secured the back to the side with some 1 ½” wood screws (fig. 8).  The process is repeated for the other side.  I could have used dowels here, however in my application, the back will not bee seen so I went for the speed of screws.
I attached the top in the same way by predrilling the holes (fig. 9) and securing it with a bead of glue and 2” wood screws. (fig. 10)
With a little light sanding to clean p the joints, the printer stand is now ready for your favorite finish or just leave it natural as I did.  (fig. 11)
fig 11 printer stand by WoodAirGrille


Rod Gunter is the Executive Director at Gunter Building Solutions and has over 20 years of experience in the homebuilding and cabinetry industries.  Rod has been responsible for building over 200 homes above the $500,000 price point.  Rod has trained large groups including all the major home centers on selling skills, construction techniques and sustainable natural wood products.  Rod resides with his family in Holly Springs, North Carolina.  Gunter Building Solutions owns WoodAirGrille.com, a leading producer of wood return air filter grilles and wood return air vents.
Saturday, August 4, 2018


30 Slot Mailbox Organizer


First graders can sometimes be hard on things.  My wife wanted a mailbox organizer for her student’s papers in her classroom but didn’t want one of the carboard or particleboard ones that only last a year or two.  So, of course, she talked me into building one.  I built this mostly with plywood and a lot of reinforcement so it would not sag and hopefully hold up to a small swarm of 6 year olds.

The design utilizes lumber I had around the shop.  My table saw sled was already set up for a ¼” x ¼” dado and I wanted to utilize that set up which is limited by the depth of the sled.  That is why I went with the 3 piece back.  (see fig. 1)  It may be beneficial to others to modify the design to a one piece back.  I also had to work with a height limit of 2 feet in order to fit under some other existing cabinets.  I set up the design with a height of 23 ¾”, a cabinet width of 36” and depth of 11 ¼”.  I cut the top to have a finished overhang of ¾” on the front and sides.  (see fig. 2)


The casework is all plywood with ¼” thick edge strips cut from ¾” stock to finish the edges of the ¾” plywood. (fig. 3)   On the ¼” shelves I used a 7/16” strip of birch with a ¼” relief rabbit cut into it with a router as a stiffener.  (fig. 4)   This will not only add strength to prevent sagging, but, will finish the front edge of the individual shelves.  The other 3 sides of the ¼” plywood are captured in dados so there should never be any sagging.


The cutting dimensions for the ¾” plywood are as follows:

·         1 – 10 ¼” x 34 ½” x ¾” Bottom
·         2 – 11” x 23” x ¾” Sides
·         2 – 11” x 22 ¼” x ¾” Intermediate Vertical Supports
·         3 – 11” x 22 ¼” x ¾” Backs
·         1 – 11 ¾” x 37” x ¾” Top
·         27 – 10 ½” x 11 ½” x ¼” Shelves

With all the plywood cut, and my table saw dado blade and sled set to cut dados of ¼” x ¼”, temporarily attached a ¼” x ¼” piece of square lumber planed down from some scrap 2” parallel to the dado blade. (fig. 5)   This will allow consistent and precise spacing of all the dados for the shelves.


Starting with the sides, I used the ¼” x ¼” spacer I just installed as a bump stop for the first dado at the top of the sides.  (fig. 6)   Since the top will sit directly on top of the rest of the box, this will provide consistent spacing for the shelves.  I then placed the dado over the ¼” spacer and cut the next dado.  (fig. 7)   I repeated this process until I had cut 9 dados in each side, both sides of the intermediate vertical supports and the 3 back pieces.  (fig. 8 & 9)


With all the dados cut, I needed to think about which parts needed to be finished and how to finish them.  All I planned to do was apply a few coats of polyurethane to make for a smooth, durable and cleanable surface.  I did not think it was necessary to finish the underside of each shelf since nothing would ever rest on it, but I also realized it would be extremely difficult to finish the shelves once the unit was assembled.  To overcome this, I pre-finished all the shelf surfaces that would be difficult to reach after assembly.  (fig. 10)


With limited surfaces in the ship to lay out the 8 pieces of ¾” plywood and 27 pieces of ¼” plywood that needed to be finished, I utilized some scrap plywood and cut dados into it utilizing the same method for the sides and back of the unit.  (fig. 11)   I then attached them to an empty wall space in the shop and used it as a drying rack. (fig.12)


I also made a single dado in some scrap ¾” plywood and inserted some ¼” plywood to work as a miniature saw horse to finish both sides of the intermediate vertical supports.  (fig. 13)


It is now time for assembly.  I started by taking one of the backs along with the two intermediate vertical supports and fitting them together with one of the top shelves.  (fig. 14)   With glue in the dados for strength, I shot 5/8” 18-gauge nails through the bottom of the ¼” plywood shelf into the ¾” intermediate vertical supports and the back at approximately a 30° angle.   I also shot 1 ½” 18-gauge nails through the intermediate supports into the back piece.


I then installed either side with the top shelf in the same way angling the nail gun slightly to shoot through the intermediate vertical supports into the backs on either side of the assembled center section.  (figs. 15 & 16)


With all 3 sections pinned together, it is just a matter of working your way up shelf by shelf.  Each shelf is inserted into the slots and secured with glue and 5/8” 18-gauge nails.  (figs. 17, 18 & 19) 


I installed the bottom with glue and 1 ½” 18-gauge nails.  (fig. 20)   I then went over the intersections of the joints with a sander to level out any imperfections.  (fig. 21)   The top is then secured with glue and 1 ½” 18-gauge nails.  (fig. 22 & 23.)


To apply the trim, I started by gluing and nailing the ¼” edge strips to the 2 intermediate vertical supports.  (fig. 24 & 25)   For the cleanest look, I left the strips long and cut them off with a flush cut saw after they were secured.  (fig. 26) 


The stiffeners were then cut to fit between the edge trim on the center section.  They were secured into place with glue and ½” 23-gauge pin nails shot in at opposing angles.  (fig. 27 & 28)   The stiffeners were then installed on the two flanking sections.  This is done before the edge trim because, unlike the center section, the trim can be easily sanded flush to the side for a very tight and clean fit.


With all 27 of the stiffeners installed, the edge trim is installed on the 2 sides, across the bottom and the top is wrapped with mitered cuts at the corners.  I used wood filler to touch up the nail holes and fill in any hairline cracks at the joints.  After it dried the entire unit was sanded smooth.  (fig. 29)   A few coats of polyurethane complete the project. (fig. 30)


Rod Gunter is the Executive Director at Gunter Building Solutions and has over 20 years of experience in the homebuilding and cabinetry industries.  Rod has been responsible for building over 200 homes above the $500,000 price point.  Rod has trained large groups including all the major home centers on selling skills, construction techniques and sustainable natural wood products.  Rod resides with his family in Holly Springs, North Carolina.  Gunter Building Solutions owns WoodAirGrille.com which produces wood return air filter grilles and wood return air vents.